Sunday 15 May 2016

1:24 Di Class

1:24 Di class

Another perfect Ken Devlin Photo, http://www.kiwibonds.com/KenDevlin/Pagebatch2.html
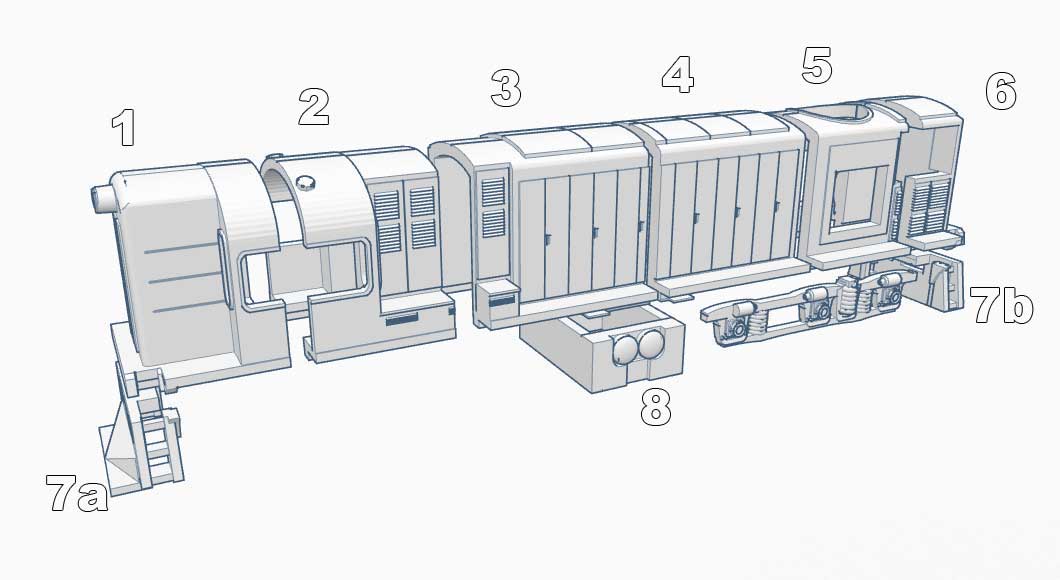
1  163.4g 10hr 16min Res0.2
2  120.0g 7hr  57min Res0.2
3  175.8g 12hr 03min Res0.2
4  168.1g 11hr 37min Res0.2
5  98.8g  07hr 05min Res0.2
6  105.0g 07hr 22min Res0.2
7a 29.6g  02hr 10min Res0.2
7b 30.8g  02hr 18min Res0.2
8  55.5g  04hr 17min Res0.2

Total Print Time  65hr 03min
Material Cost 947g (less bogies)


1:24 Di, at this stage using 60 grit sandpaper to do most of the legwork, a small wooden block the size of a deck of cards gives 3 different sized surfaces ideal in for this size job. I've been finishing surfaces with 180 & 200 grit.
1:24 Di, I probably should have tried making the steps thinner, but held off after convincing myself stronger is better in this location. After seeing it in the flesh like this im not so sure. Perhaps after painting & weathering it may not stand out as much.
1:24 locos underway. Dbr now has fuel & battery tanks. DL requires more filler in lots of areas followed by more sanding.
After further work...
Nippon pink springs to mind, so does red wine.
1:24 Di class showing off handrails, which are all 3d printed. Still a few left to do. Also been experimenting with painting the DL cab up as can be seen in the pic.


1:24 people participate in a group photo..

Saturday 7 May 2016

1:24 DBR Class

3D Printed 1:24 DBR Class. 
The entire body less the bogies & fuel tank, took exactly 1kg of material at a cost of $40 via sandbrooks in auckland, including a time cost of roughly 5 days.


Prototype - Photo by R.Bryant - 1997 DBR 1200

1:24 DBR Class, "sectionalized". If anyone is selling g gauge SD35, SD24, SD7/9's on ebay beware, its going to be chopped up on arrival, huge festival & burning ceremony. bands n everything.
1:24 DBR Class, Printed sections glued together, sanding & painting begins. 
1:24 DBR Class, Headstocks attached, sanding & painting continues..

1:24 Wab on left about to receive correct cylinders.

Pretty happy with results thus far, more sanding in places will give it a nice smooth look. Printing of detail parts, cab interior, fuel tank & bogies continue. 
After Painting & adding printed details such as handrails & steps., 2mm thick. Longhood top handrails still to print.
Also visible behind the Dbr is a (Lewis Holden) Designed 1:24 scale GSX 20Ft side opening container.
1:24 Dbr
1:24 Dbr, Now with all handrails & showing off the 1:24 50ft Car First Class BPX25175 (Neil Wards Design 4 9mm)

Largest decals i've yet had to print/apply 1:24 Dbr 1200
1:24 Dbr 1200 "the other side/end"
Da control stand on left, dbr on right, many considerations, big handles that might survive printing.

Da control stand, yet to print the Da... I blame the gin.

New drivers meet with senior management, their arms & expression seemingly in a state of disbelief upon learning their fate.


A more fitting control stand for the Dbr, drivers remain in pose of utter disbelief.
Everything in place, and a crew that looks like their being paid.


h

Sunday 1 May 2016

1:24 Kiwirail DL Class

1:24 DL, A model of national significance :P
Latest "NZR" locomotive, Kiwirail DL Class. Image sourced from wikipedia.org/wiki/New_Zealand_DL_class_locomotive
Thus far 4 sections printed. The white section was printed about 7 months ago now, and since I've experienced warping failures since due to the sheer size of the sections. Still not perfect (see slight gaps in the laminating that need some bog) but finally back on track after repairing the UP Plus 2. Sections are joined together with printed adapter parts..

Another section completed & sitting in place. Bogies finally removed from donor loco.

Showing the result of printers behaving badly. The 2nd section from the left suffered a rather large moth landing on the surface & got stuck in the print, thrashing about causing the fragile supports to fail. Lucky I saw it. If it happened overnight then the printer would continue to print regardless. The primer grey section (center) is going to be a paint & decal test, might even put glazing, lights in & mount it on a picture frame. Possibly coming out of a tunnel portal, dunno yet.

1:24 Dl progress so far, all sections finally printed! The cab ends were the most difficult but simply changing the object orientation on the printer was the breakthrough. The joining of the sections on the Right-hand side cab is out by 0.5mm, so work required to fix it best i can.

And after a lick of paint


In good fashion, Its better to go back to old posts such as this & keep em updated, as there's no sense rushing these things.
Some pics are adding quite a bit of detail, for the first time decent airhoses, handgrabs etc.


Showing the placement of detail parts, which are pre-aligned & grouped into seperate files accordingly ready for printing. 


18v Battery Power

I recently saw a post about 18v Battery Power being used on model trains as a source of motive power, the sort you might use on a drill or a...