Wednesday 21 February 2024

Building an brick arch railway bridge

After receiving some used bricks I spent some time wandering youtube and stumbled across DIY videos of people building brick archways and figured it would make an interesting challenge. I decided to place it at the bottom of the lower horseshoe loop where it would build up a few inches of water during rain. I also needed to raise the track height about a foot.

For the arch I built a frame out of scrap wood, using "no more nail" glue and screws. This held up the weight of the bricks, a few bits of wood held it up and when time to remove the frame I got rid of the supports and the frame dropped down and slid out without issue.

Once the bricks are all in place I'm toying with the idea of plastering the sides with cement & a lick of paint.

Saturday 20 January 2024

Trying a triangle again

 Trying the triangle again, but this time with a firmer foundation. Edging ever closer to the ability to change the climax's direction on a whim. The roadbed remains largely intact, as does the significant tree stump I successfully ignored the first time & prophetically still remains an issue, This time I planned to diligently chip away at it with an axe to remove the issue & allow the roadbed to curve properly but this did not eventuate, 2 additional turnouts have been built & function well. I'm now trying to decide what to tackle next on the railway with consideration given to the bottom horse shoe loop bridge & pond. Time will tell.

Top turnout largely finished, all turnouts have a temporary length of track running back a few metres letting me change the point while seated on loco. I plan on using aluminium/steel rod & a water hose.
From above, still partway through cementing the bricks in place. midway through the turnout build, through traffic can resume in between works

Haven't we been here before - 2022
From below
Bottom turnout, the climax can climb the steep grade with and adult & child no worries, in dry conditions..

An elevated view

The last 12m leg of the triangle - Pink

Wednesday 17 January 2024

Horseshoe curve easement

Witness the transformation of the top horseshoe curve as we widened the embankment using a rock wall topped with two layers of recycled bricks. The result? A more natural curve that rides better.

Initially considered a reversing triangle in this location, (see last picture), however we opted for the location of the earlier 5" gauge layout that was damaged from the storm. The chosen triangle location allows trains to effortlessly traverse from the main house down to the loop and back again, eliminating the need for complex shunting or turntables. 

A curve that finally follows the radius peg, bricks also proving useful in retaining my ballast and creating a nice division from the greenery

Rock and brick

Top Horseshoe Bridge,after relocating the turnout sleepers

A month prior

Monday 1 January 2024

Steaming Into the New Year: Unveiling the Upgraded G Gauge NZR-Themed Model Rail Loop

As we stand on the precipice of a new year, there's a palpable sense of anticipation and excitement in the air. Today, we invite you to join us on a journey where the magic of model railroading meets the grandeur of full-scale adventure. In the heart of this fusion lies the unveiling of our meticulously upgraded G gauge 1:24 scale NZR-themed model rail loop, now seamlessly integrated into a larger ride-on railway. The shed will enventually hold the G gauge rolling stock & locomotives on shelves built into the shed walls, giving easy access and an interesting view for passengers passing through the "shed/tunnel".

Imagine the charm of a miniature world, meticulously crafted in 1:24 scale, where the essence of New Zealand Railways comes to life in stunning detail. But this isn't just a tale of a model rail loop; it's a story of evolution and resourcefulness. As we upgraded to the larger 7.25" scale, we found ourselves with leftover 5" sleepers—a surplus that sparked creativity and ingenuity.

In the spirit of recycling and sustainable craftsmanship, these leftover sleepers have found a new home on the G gauge wooden section deck. This marriage of scales and materials not only showcases our commitment to environmental consciousness but also adds a unique character to the upgraded model rail loop. It's a harmonious blend of the old and the new, where each sleeper tells a story of transformation and adaptability.

Now, let's pause and immerse ourselves in the visual delight that awaits. Below, you'll find captivating perspectives of the upgraded model rail loop, captured from different angles. These images not only showcase the intricate details of our 1:24 scale world but also provide a glimpse into the seamless integration with the larger ride-on railway.

As we venture into the new year, may this journey inspire you to see the beauty in re purposing, the magic in evolution, and the joy in exploring uncharted territories. Join us in celebrating the resurgence of our G gauge 1:24 scale NZR-themed model railway, where the echoes of the past harmonize with the excitement of the future.

Di & 15 Q wagons make the very first run.

The 7.25" should also follow the loop around the G gauge & form a reversing loop. Having a camera on the 7.25" chase wagon filming a NZR G gauge train in motion.

Last little section finished & the first coal train rolls through, the entire loop is largely level, track pinned down & brand new track connectors have replaced the old dirty ones, going to run a power bus under the trackbed & have feeders every few meters

Footbridge was recycled up from the old 5" layout

Shelving being installed

I really need to sort the water tank, build a proper shelf slightly higher and tight again the shed. Waiting until i use the water, which is disconnected from the spouting at the moment

1:24 Scale trains begin to repopulate their home

An early and modern General Electric U26C

A friendly tree frog visits


Thursday 21 December 2023

From Ruins to Rails

Sorting the remains
In the wake of the Great Brick Shortage of 2020, the world stood on the precipice of a supply collapse. Cities crumbled, and decay weighed heavily on the shoulders of once-majestic buildings. To add to the woes, a frightening virus loomed over humanity. But amid the chaos, a glimmer of resilience emerged.

As the dust settled and people surveyed the wreckage, a newfound ingenuity took root. Communities came together to salvage what remained, turning the debris of fallen structures into a resource for rebirth. Two truckloads of rubble, collected from the remnants of the once towering buildings, became a symbol of hope.

In the midst of this recovery, a kind-hearted man with a big bucket on his digger volunteered to help load the rubble onto trucks. His generosity and willingness to contribute turned a daunting cleanup task into a communal effort. The rubble, once a symbol of destruction, now held the promise of renewal. 

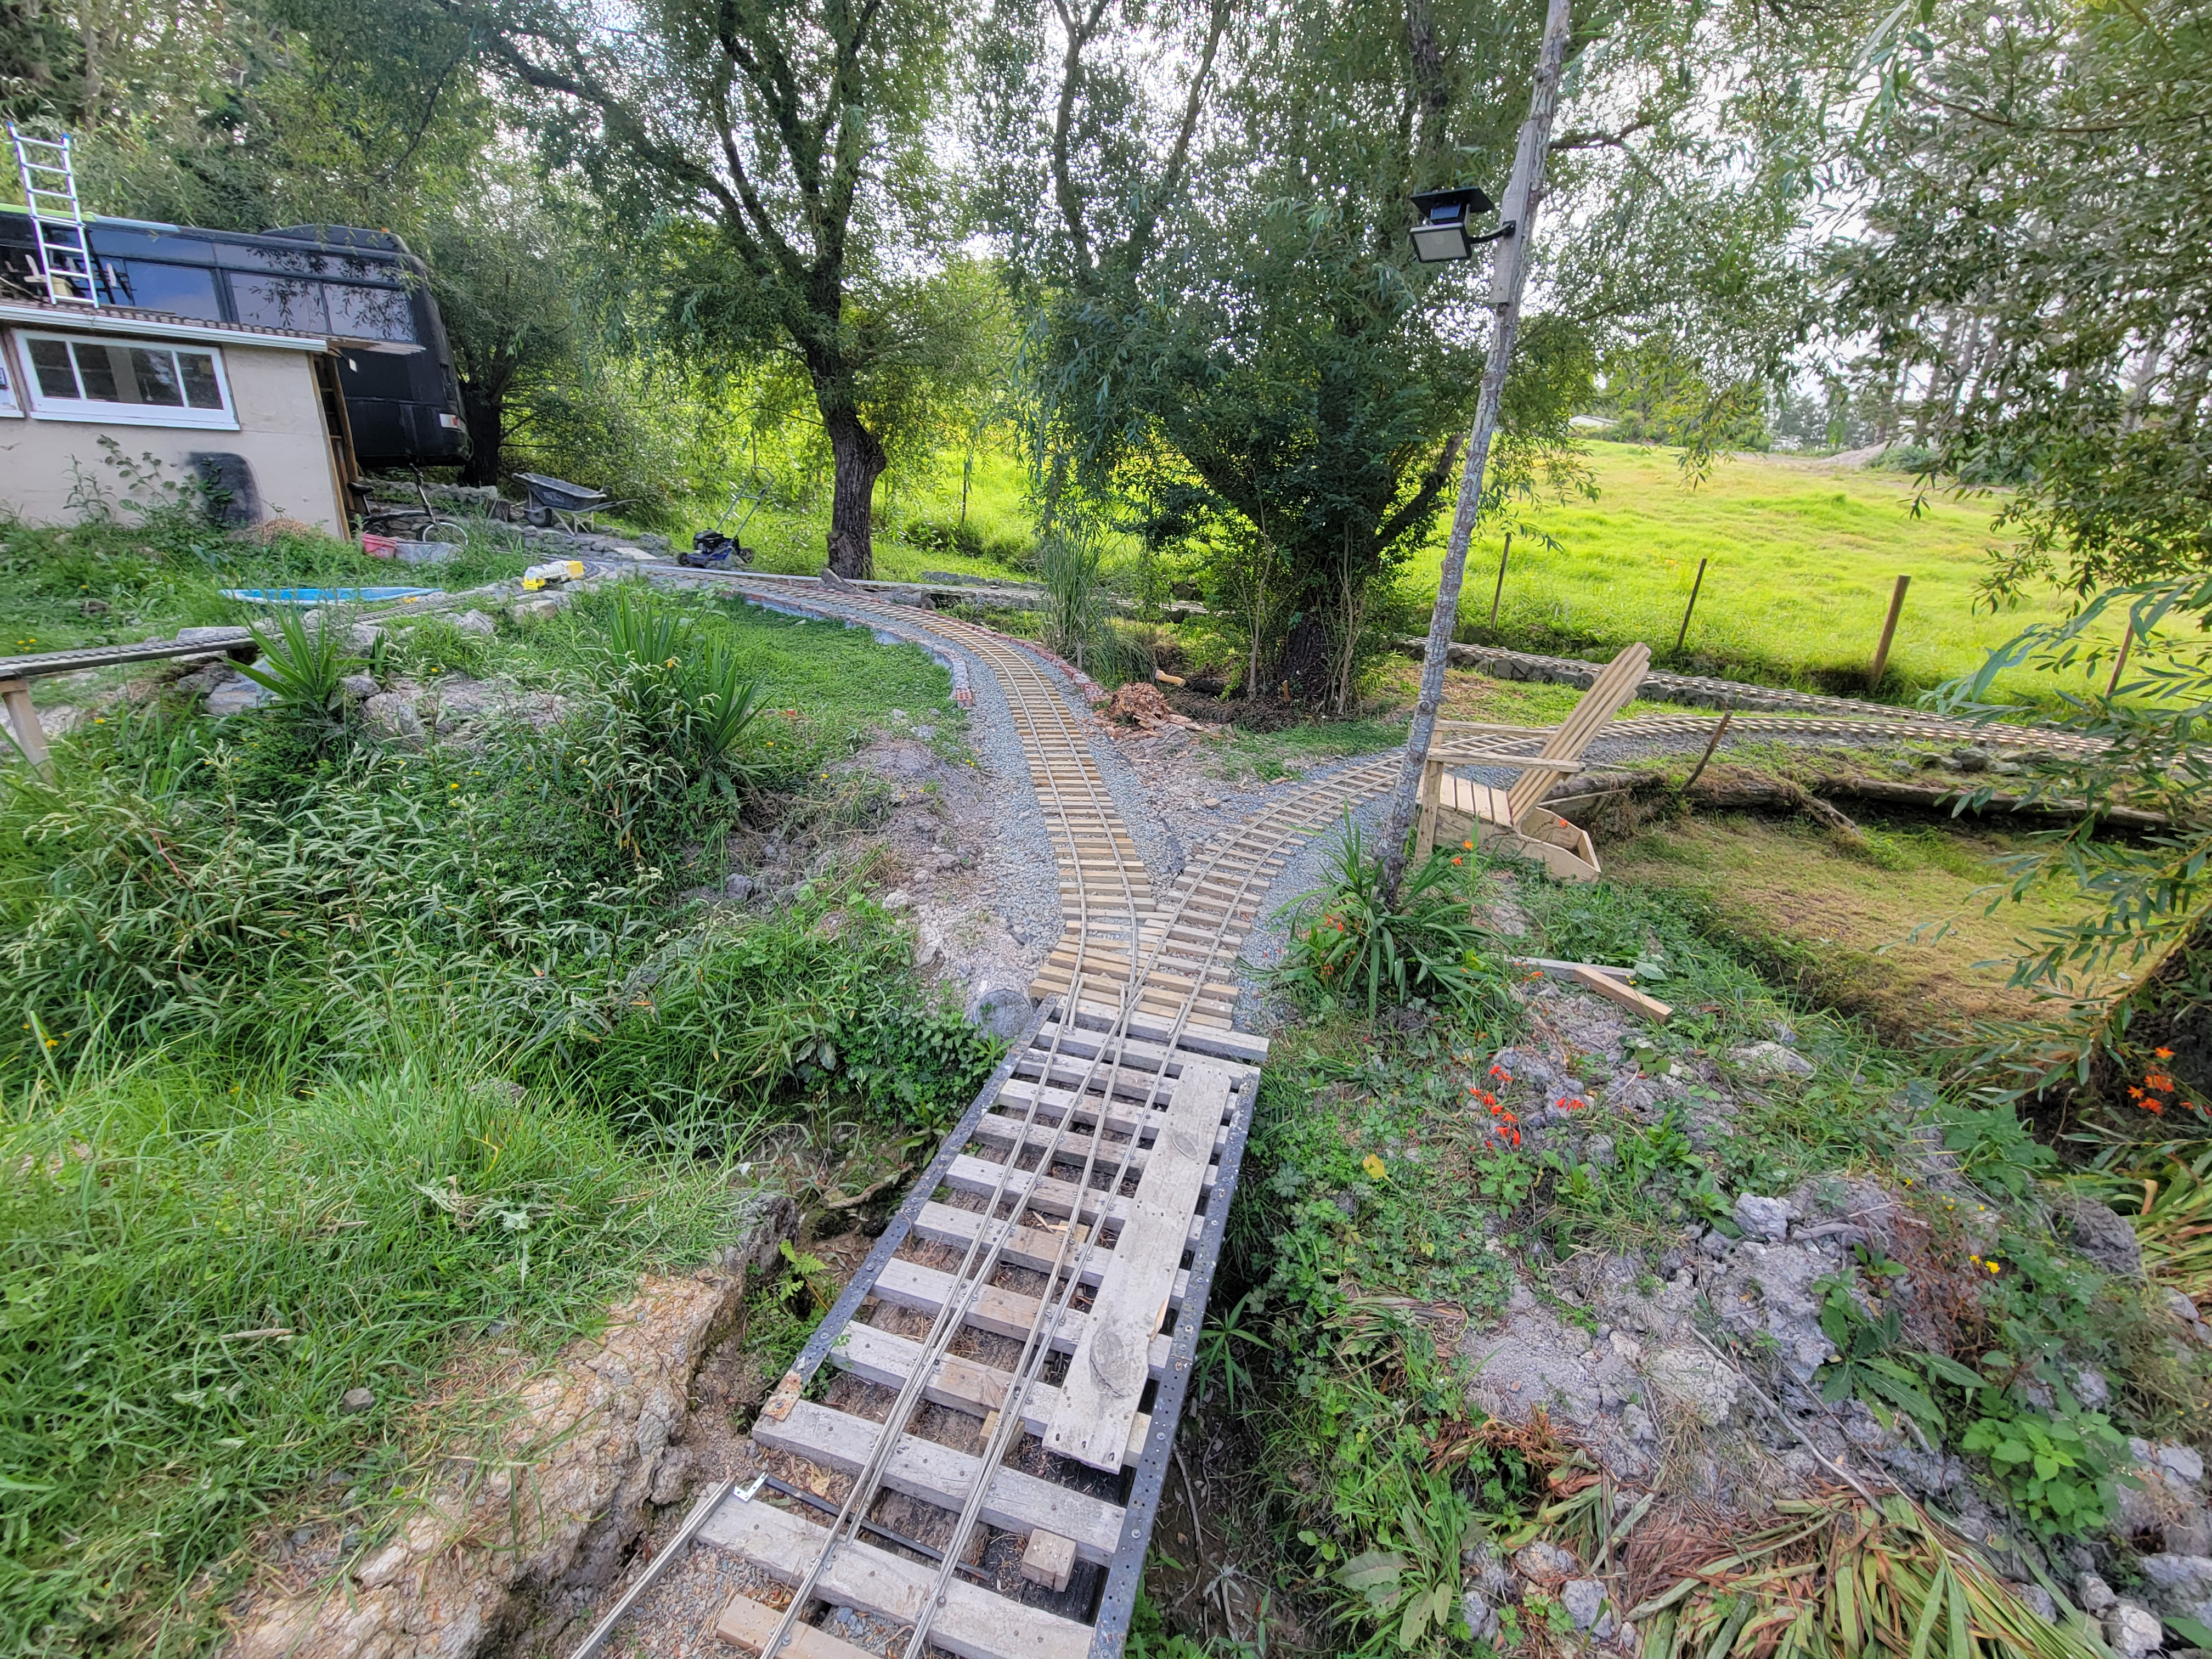
The community had a vision – a railway that would connect different parts of the land, going from Dad's shed to the top house. The railway, steep, winding, and spiraling, would be a testament to human resilience and creativity, especially since traditional switch-backs were no longer an option with the scarcity of inches & misunderstood management.

An unnammed man with a digger & big bucket, known for his helpful nature, loaded the trucks with care, understanding the importance of each brick and piece of debris. The old bricks, once part of grand structures that defined the cityscape, were destined for a new purpose – to lay the foundation for the ambitious railway project.

As construction began, the town buzzed with activity. People from all walks of life joined forces to rebuild, transforming the discarded remnants of the past into a path towards the future. The railway, rising from the rubble, wound its way up the steep incline, defying the challenges imposed by the shortage of bricks.

Finally, at the top of the railway, a breathtaking view awaited. The once-devastated landscape now showcased the beauty of resilience. From Dad's shed to the top house, the spiraling railway not only connected different parts of the town but also symbolized the community's triumph over adversity.

Standing at the summit, one could absorb the entire panorama, including the distant Main Highway 1. The old bricks, once witness to the collapse of the past, now played a vital role in shaping the future. The town had not just survived; it had evolved, demonstrating that even in the face of scarcity and decay, human ingenuity could carve a path to renewal and breathtaking vistas.

Used adult sized Lego

In this preliminary proposal, note the elevation profile of the planned path, highlighted in light blue at the bottom. The line to the top of the railway demonstrates a consistent grade, ensuring a smooth and uniform ascent. 

Friday 25 August 2023

5 month long Rebuilding effort

After an intensive five-month effort, I'm thrilled to share the comprehensive journey of rebuilding the main loop and siding leading to the engine shed. The main loop spans an impressive 140 meters with a minimum radius of 6 meters. Elevations fluctuate from a minimum of 38 meters above sea level to a peak of 41 meters. The Shed siding running a further 50 meters and ends near dads shed.

This ambitious project relied on sheer determination and hard work, with the primary tools being a wheelbarrow, spade, truck, and access to a local quarry. Introducing my old man's plate compactor to the process proved highly effective, especially when covering weed mats with gap20. The compaction ensured a solid foundation, and I'm eager to see any attempt by weeds to break through!

The surface has held up remarkably well under constant wheelbarrow loads, leaving no noticeable impressions, a testament to the meticulous care put into the construction. The once troublesome railway bridge, responsible for the initial damage, has been successfully removed. In its place, concrete abutments have been expertly cemented, and four repurposed railway sleepers now form the sturdy foundation of the new bridge.

This journey of transformation showcases the power of perseverance, resourcefulness, and innovation. As we move forward, the rejuvenated railway stands not only as a testament to hard work but also as a symbol of resilience and dedication to preserving the beauty of our surroundings.

The "Google Earth" App one would download as opposed to google maps on your web browser lets you draw lines which gives a lot of useful info, obviously it wont recognize my track-bed height

The progress on the engine shed is substantial, with only the finishing touches required for the ends. I'm contemplating an extension lengthwise to maximize space for the 1:24 garden railway. The idea is to incorporate a couple of tracks running the length and seamlessly connecting to the outside railway. This expansion will not only enhance functionality but also create a more versatile setup. Rest assured, the 7.25" Climax locomotive should fit comfortably within the extended space, ensuring a safe and efficient operation.

7.25" Climax & wagon haul plate compactor to new section of railway

Looking down from the recently built engine shed, my younger brother Andrew enjoying a rather short ride..

The long road ahead is far more accessible via rail, a not so common picture of me on the blog

Dad and Daisy on a miniature train they steer,
Around the railway laughter rings crystal clear.
Tiny tracks carry dreams a whimsical ride,
In the world they've crafted joy multiplies.

My oldest son has a ride

1145mm long H4 treated fence battens cut into thirds to create a narrow gauge feel. Many thanks to dad for the wisdom here as indeed it looks the part!


Bottom Looking up before

Bottom Looking up after


Preliminary survey pic of horse shoe loop, at this stage negotiating land acquisition & coordinating long-term transport provision & identification of dads future 15" gauge railroad projects

Horseshoe loop from below after staking out the 6.8m radius pegs, the string was not required and I ended up constantly getting caught on em while hauling rocks around.

Horseshoe loop from below sometime later, drainage pipe on left visible

Showing the build method, walls first, fill with clay then compress & repeat until desired height. Finally cover with weed matt then gap20.

Weed mat pinned down

Horseshoe loop from below at "Quake crossing" after plate compacting

Horseshoe loop from below at "Quake crossing" after track laying & ballasting

Slight deviation from break breaking work. the 1:24 garden railway gets some much needed attention, flat reinforced concrete pavers, weed mats, concrete & stone will create a solid weed proof foundation.


Supergluing scrap wood formwork in place before pouring concrete. Some chicken wire for reinforcing should be effective enough.

Looking from dads place, the roadbed, compacting & track laying on this section has largely been finished. I failed to take any photos of the effort here, Many tree roots, stones & stumps in the way that took weeks to chew through one step at a time. The shed will be elongated and curved to match the railway forming a tunnel of sorts. 

Cutting, marking & stacking of sleepers.

Horseshoe loop after ballasting

Arrived at the bridge

Looking back from the bridge after ballasting & tamping

Another load of sleepers arrives

Roxy holding down the roadbed


Point blades fixed to a bit of metal & bracket with 2:1 mechanical advantage, need to find a light bar to extend the switch about 10ft down the line so it can be changed without dismounting. I've sanded the sleeper tops to keep friction down & need to treat em with varnish

Building the first turnout

Top loop bridge

Top horseshoe loop bridge

Top horseshoe loop

Building an brick arch railway bridge

After receiving some used bricks I spent some time wandering youtube and stumbled across DIY videos of people building brick archways and fi...